Trains.com

Subscriber & Member Login

Login, or register today to interact in our online community, comment on articles, receive our newsletter, manage your account online and more!

Painting Kits: When? Also, bricks?

2300 views
8 replies
1 rating 2 rating 3 rating 4 rating 5 rating
  • Member since
    March 2012
  • From: Stow, OH - originally Boston
  • 177 posts
Posted by Paul D on Friday, July 3, 2015 9:59 AM
Like Mike, Stix, & Rich, I paint & weather all sides inside & out before assembly. I earned my MAM degree (Master of Applied Masking) early on, and it takes me a whole session to prep for detailing trim, lintels, sills, sashes, etc. I find it much easier to do that detail stuff when the wall is laying flat and I have a place to rest my elbow instead of trying to detail a “box” after assembly. 
  • Member since
    September 2004
  • From: Dearborn Station
  • 24,281 posts
Posted by richhotrain on Friday, July 3, 2015 5:15 AM

I paint all of the individual parts before assembly.  It is a lot easier to handle that way as opposed to painting the assembled structure.  

Rich

Alton Junction

  • Member since
    January 2004
  • From: Canada, eh?
  • 13,375 posts
Posted by doctorwayne on Wednesday, July 1, 2015 12:29 PM

Sent you a PM, Dave.

Wayne

  • Member since
    September 2003
  • From: Omaha, NE
  • 10,621 posts
Posted by dehusman on Wednesday, July 1, 2015 9:55 AM

I love those stone factory/mill kits but they are out of production.  Bummer.

Dave H. Painted side goes up. My website : wnbranch.com

  • Member since
    January 2004
  • From: Canada, eh?
  • 13,375 posts
Posted by doctorwayne on Tuesday, June 30, 2015 12:35 PM

Like Mike, I prefer to paint the basic structure after it's been assembled.  This allows you to make alterations and touch-up areas where the parts don't fit as well as they should - this is especially true of corners, particularly on structures representing masonry.
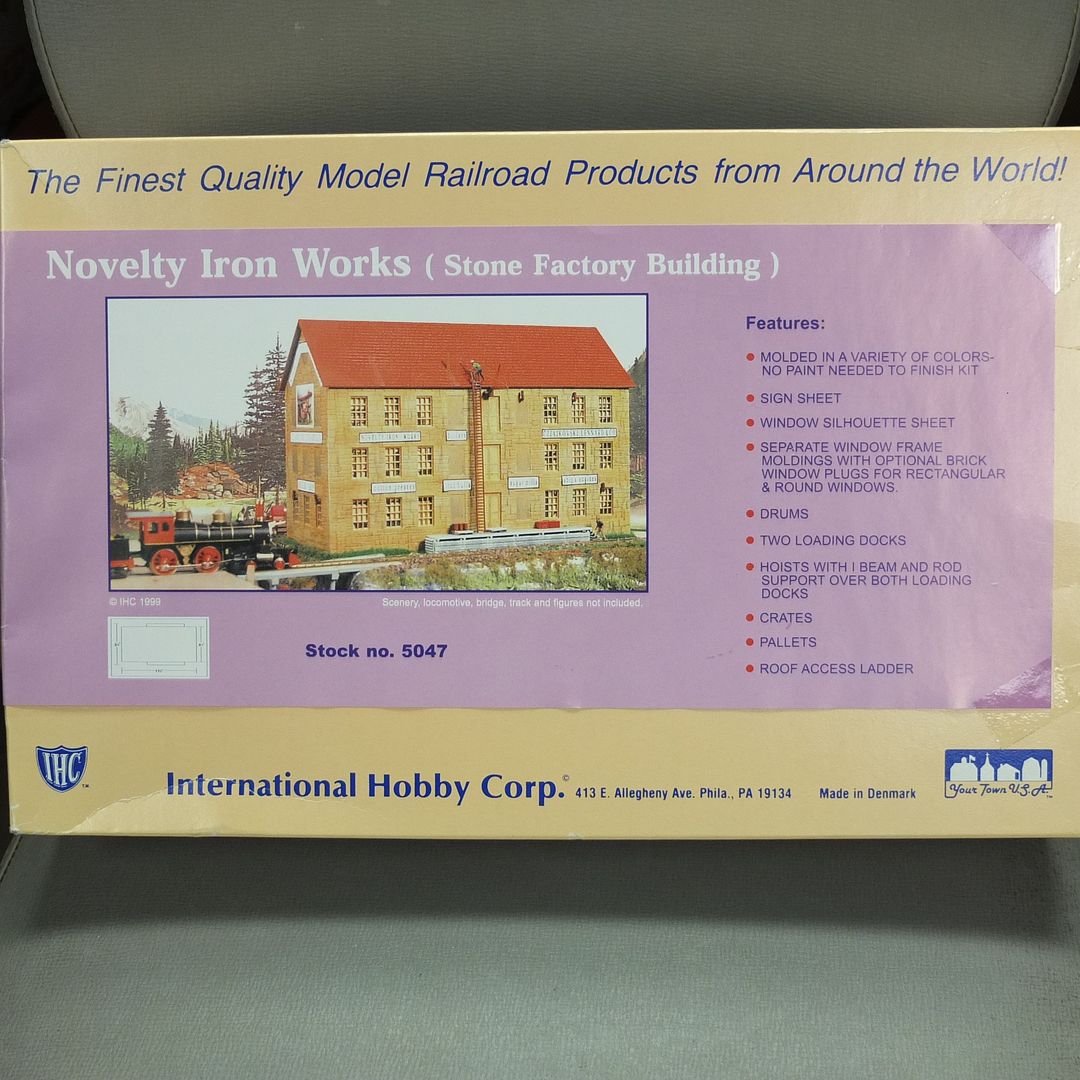
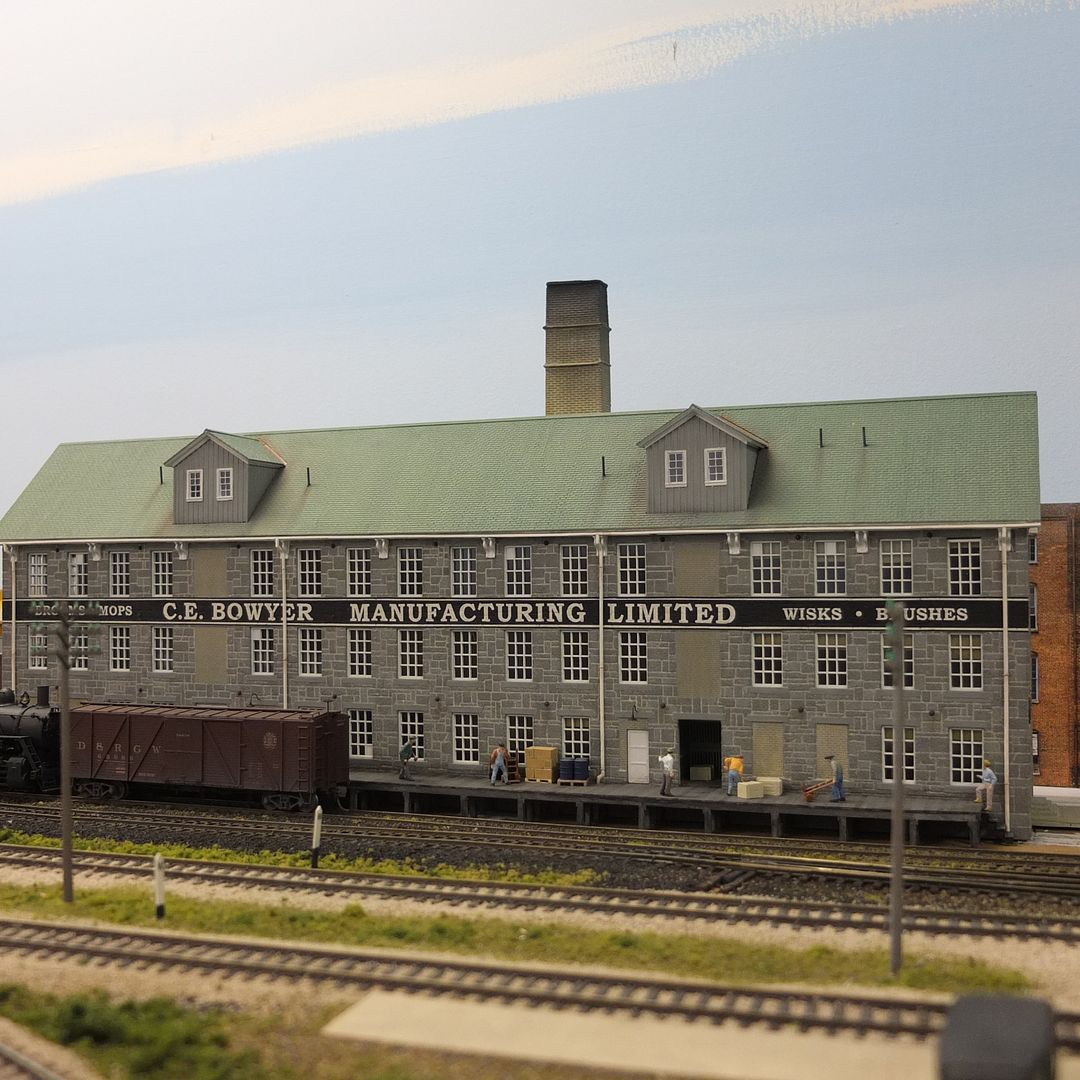
This simple IHC kit was built with both long walls facing the viewer:
To maintain the proper window spacing, the mating ends needed to be shortened.  I picked the most advantageous point on each piece, then, after cementing them together and reinforcing the rear surface of the joint with a sheet of .060" sheet styrene, I re-scribed the mortar lines using a #11 X-Acto blade and a dental scraper.  The stones were then painted in various shades of stone-like colours, using a brush. Here's a detail view showing the stonework. 
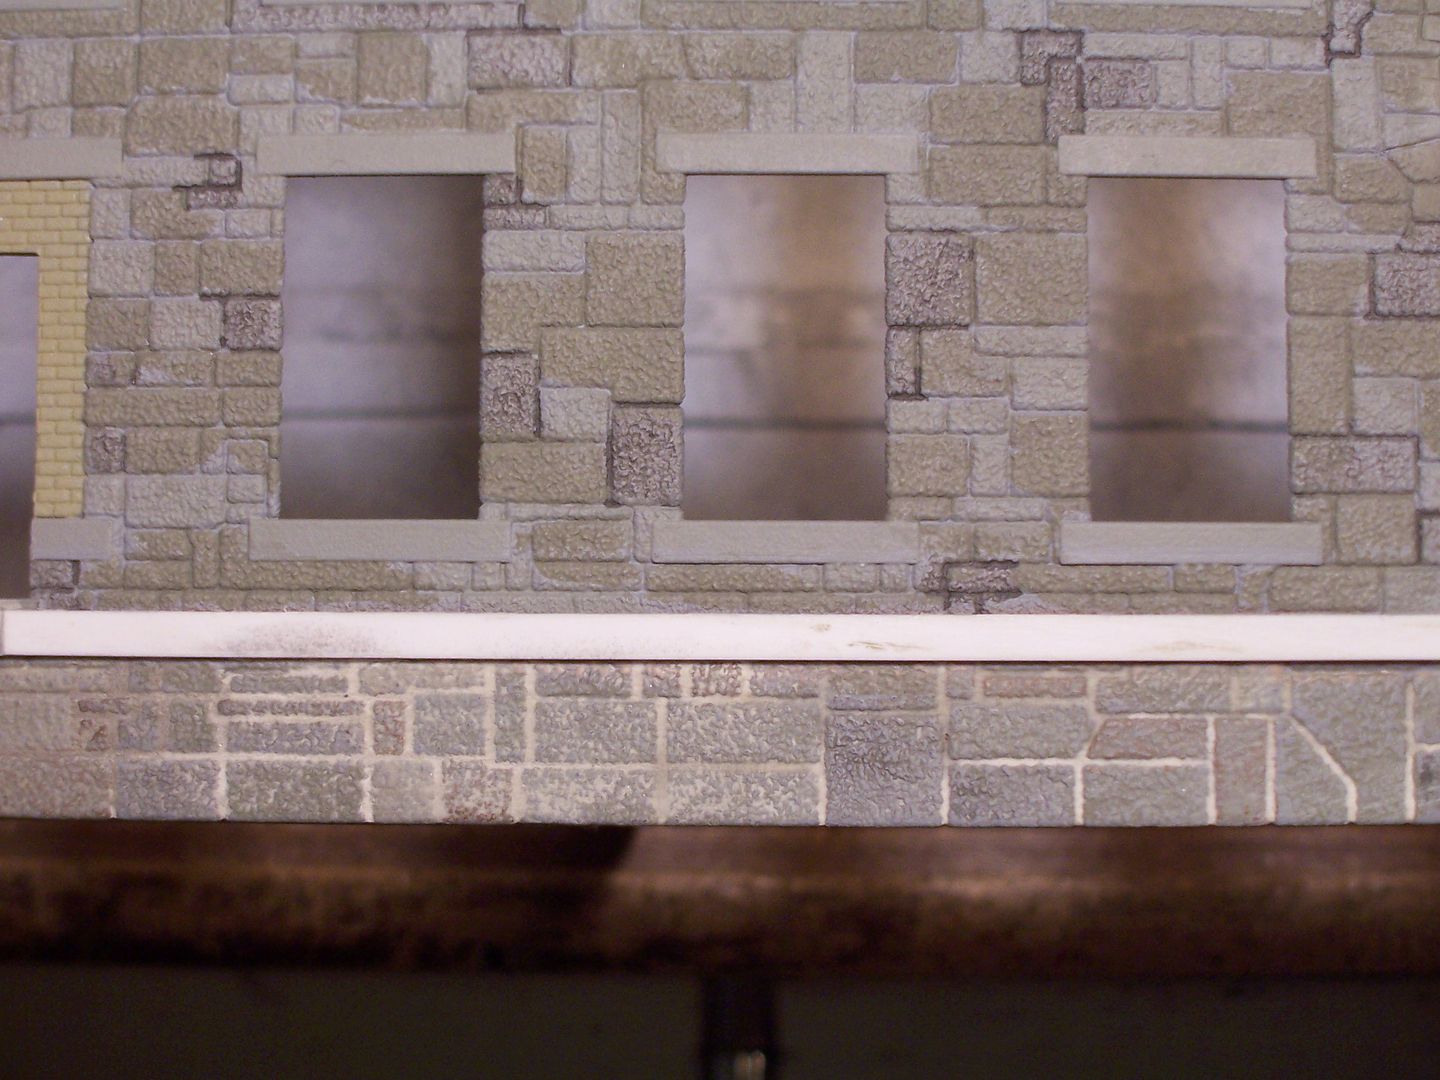
As you can see, some of the thinned paint which I used ran into the mortar lines.  The lower portion shows why that was not a concern, as I used a rag over my fingertip to apply pre-mixed drywall mud to represent mortar.  This covers the stone completely, making the colour differences more subtle.  Once the mud has dried (only a few minutes) I used a dry rag to wipe off the excess - best to do this outside, and shake out the rag often, preferably staying upwind of the shaking activity. Stick out tongue

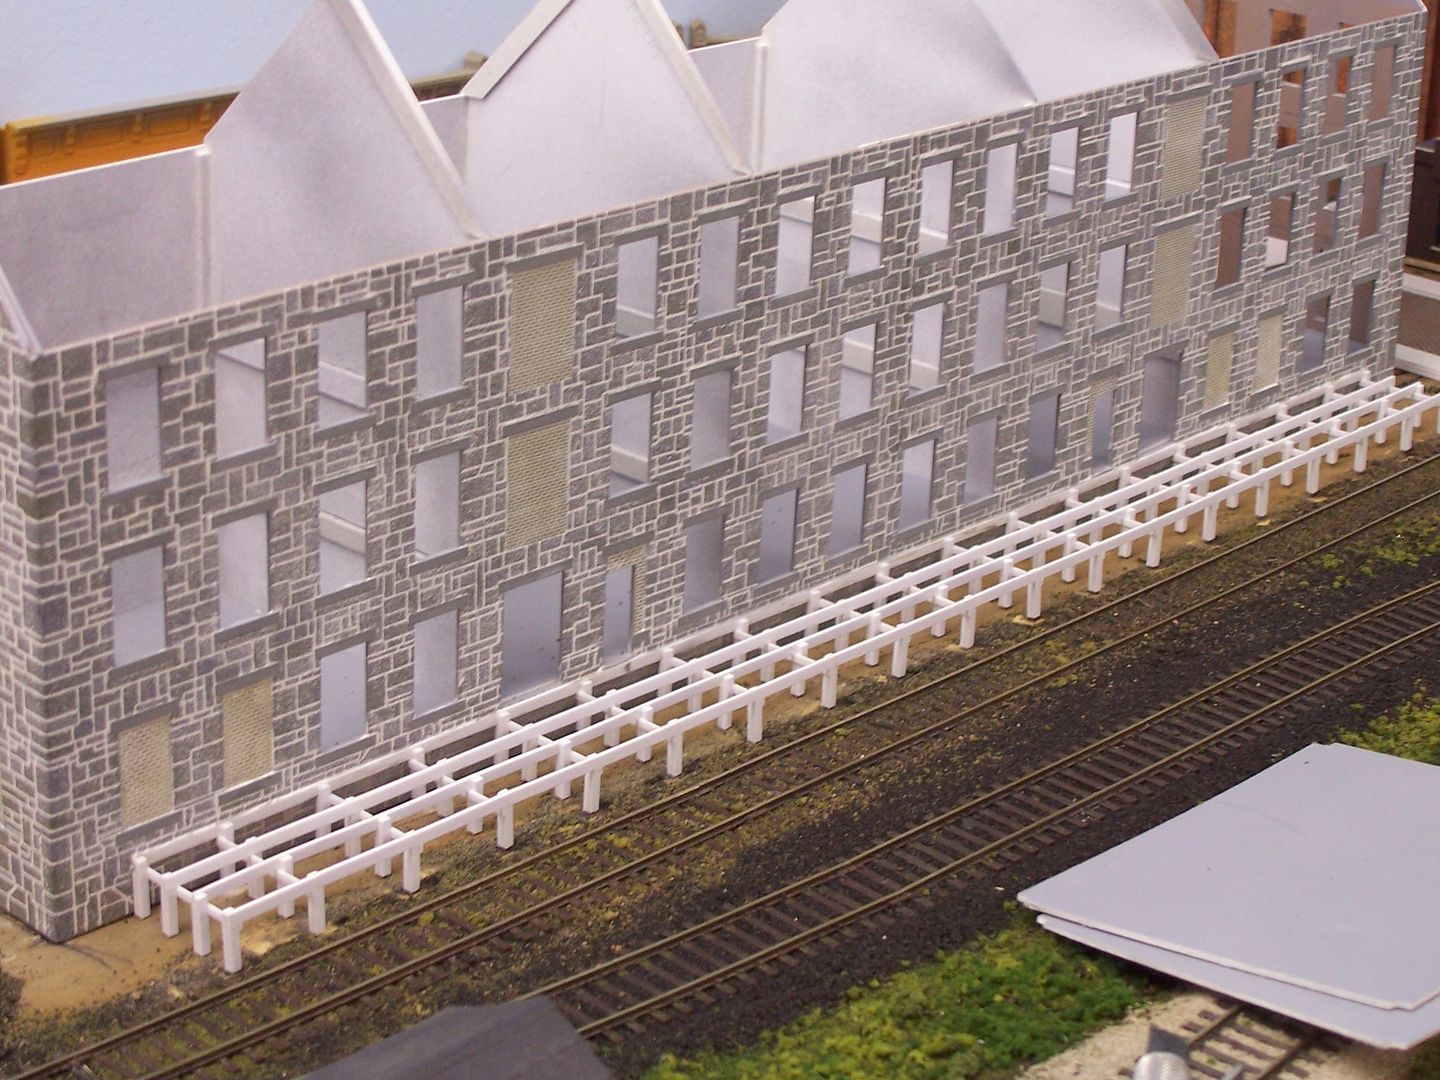
Here's the building after the walls have been assembled, painted and had mortar added.  The splice is approximately mid-way along the wall, and isn't noticeable even close-up:
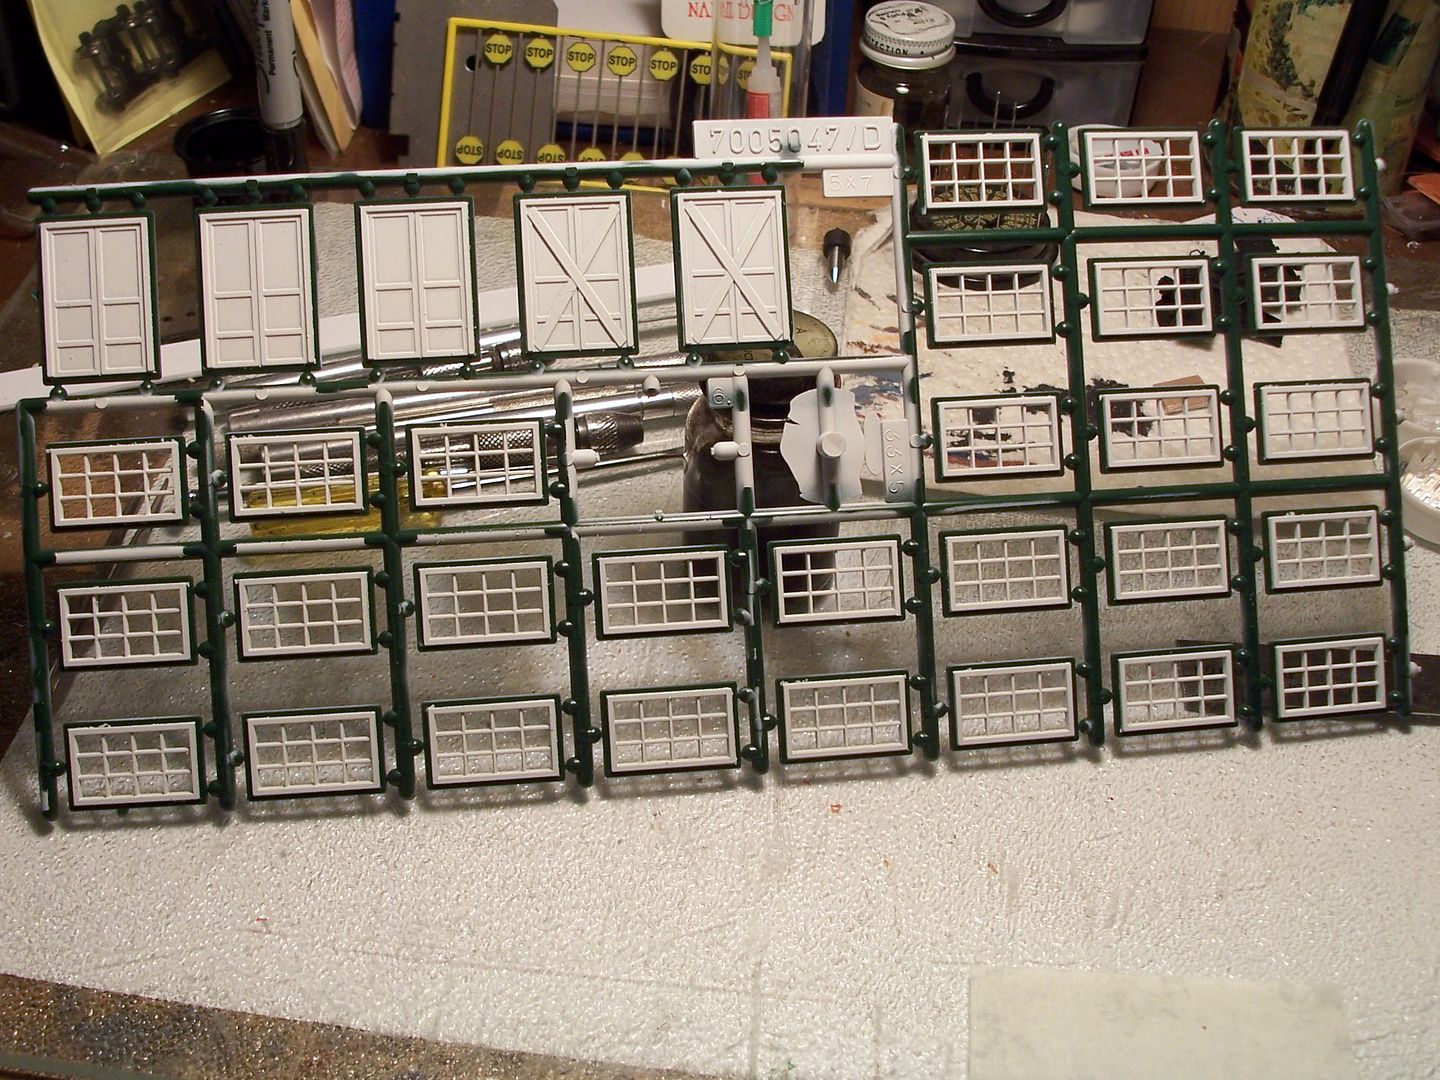
For detail parts, such as doors, windows, and trim, it's often easiest to paint them while they're still on the sprue.  Lay out some masking tape, sticky-side down, on a sheet of glass, then use a sharp blade to cut it into strips suitable to mask the gluing surfaces - in the photo below, most strips are continuous, crossing one another where they meet.  This shows the sprue after painting with grey primer:
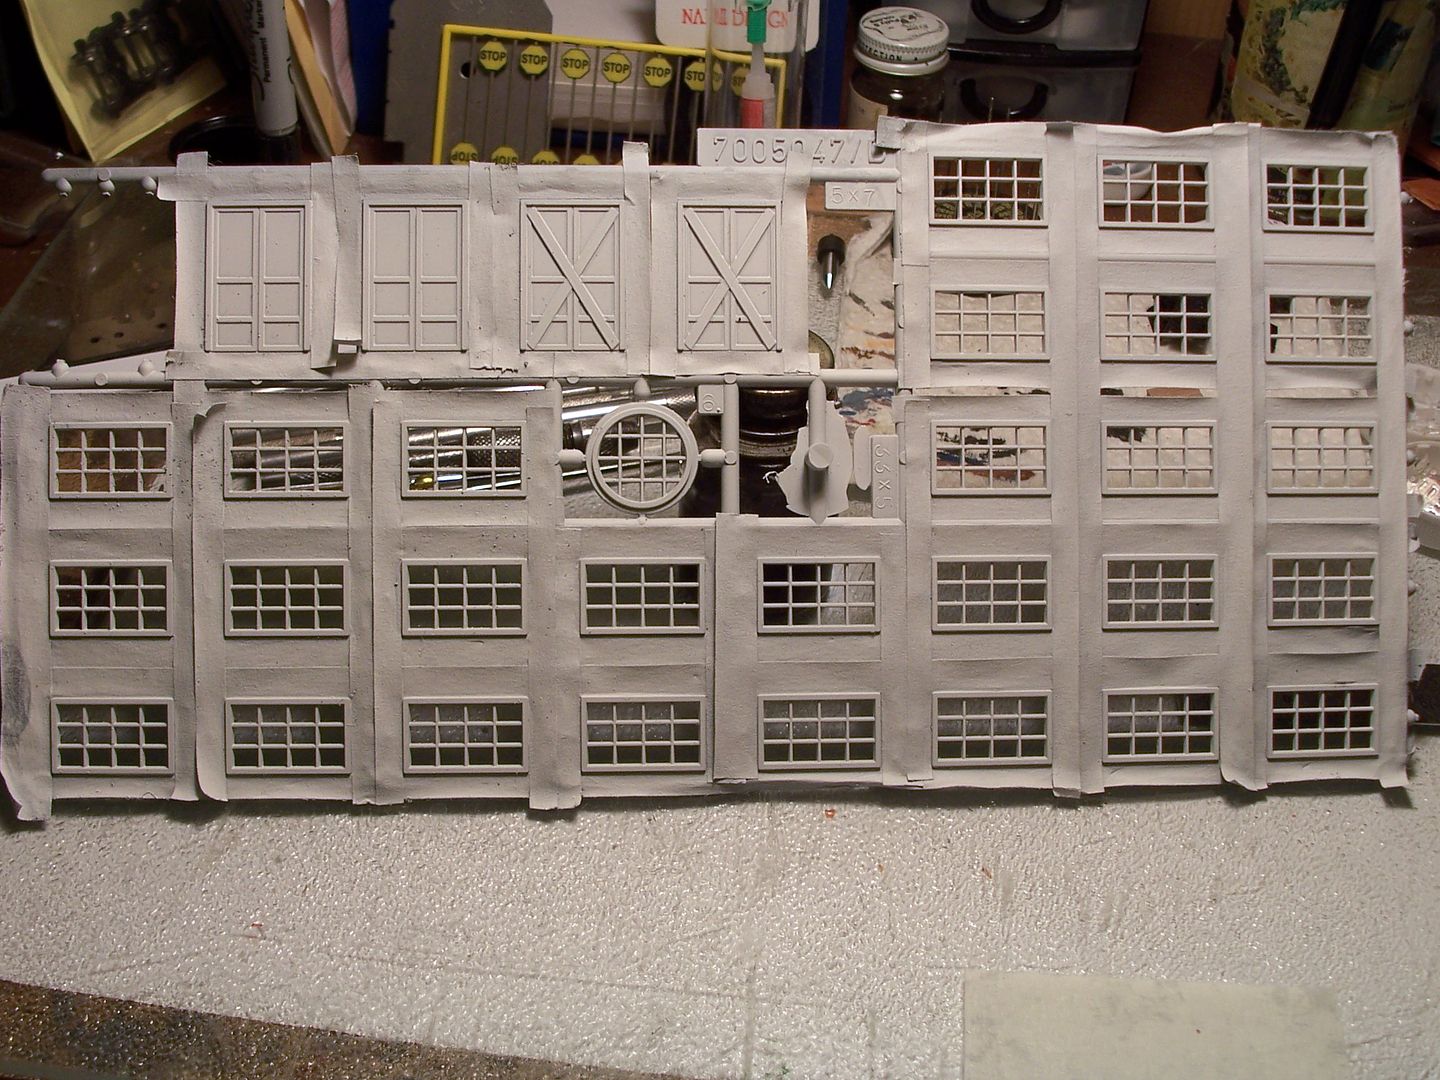
...and here, after an application of white, with the tape removed.  The gluing surfaces, dark green, are paint-free and ready to be added to the walls using solvent cement:
For corners with bevelled edges which fit poorly (this structure wasn't bad at all) it often helps to increase the angle of the bevel, so that only the visible edges touch.  I use a piece of 150 grit sandpaper, face-up on the workbench, then, while holding the wall, also face-up and at an appropriate angle, draw or push the wall's bevelled edge across the paper - I've found that drawing and  pushing increases the chances of damaging the visible portion of the bevel's edge. Bang Head
Apply solvent-type cement to both edges, let it sit for half a minute-or-so to allow the plastic to soften slightly, then recoat both surfaces and bring them together with some pressure.  Don't worry if some plastic oozes out.  Place the longer wall face-down on a flat surface, then use a machinist's square to align the joined wall vertically.  Next, add a full-height strip of Evergreen square stock - .100" or .125" works well for big structures, while .060" is okay for smaller ones - to the inside of the corner.  Carefully push it into place while holding the wall sections from moving so that the corner joint doesn't separate from the pressure and so that the vertical wall remains so, then add solvent cement along both edges of the strip where it touches the walls.  Capilliary action will draw it into the joint.  Let the joints cure fully (overnight) before moving anything, then use a sharp blade to trim away any material which has oozed out and to re-scribe any filled-in mortar lines, carrying them around the corners.  I lightly sanded the exterior of the corners to remove the overly-sharp edges of the stone.
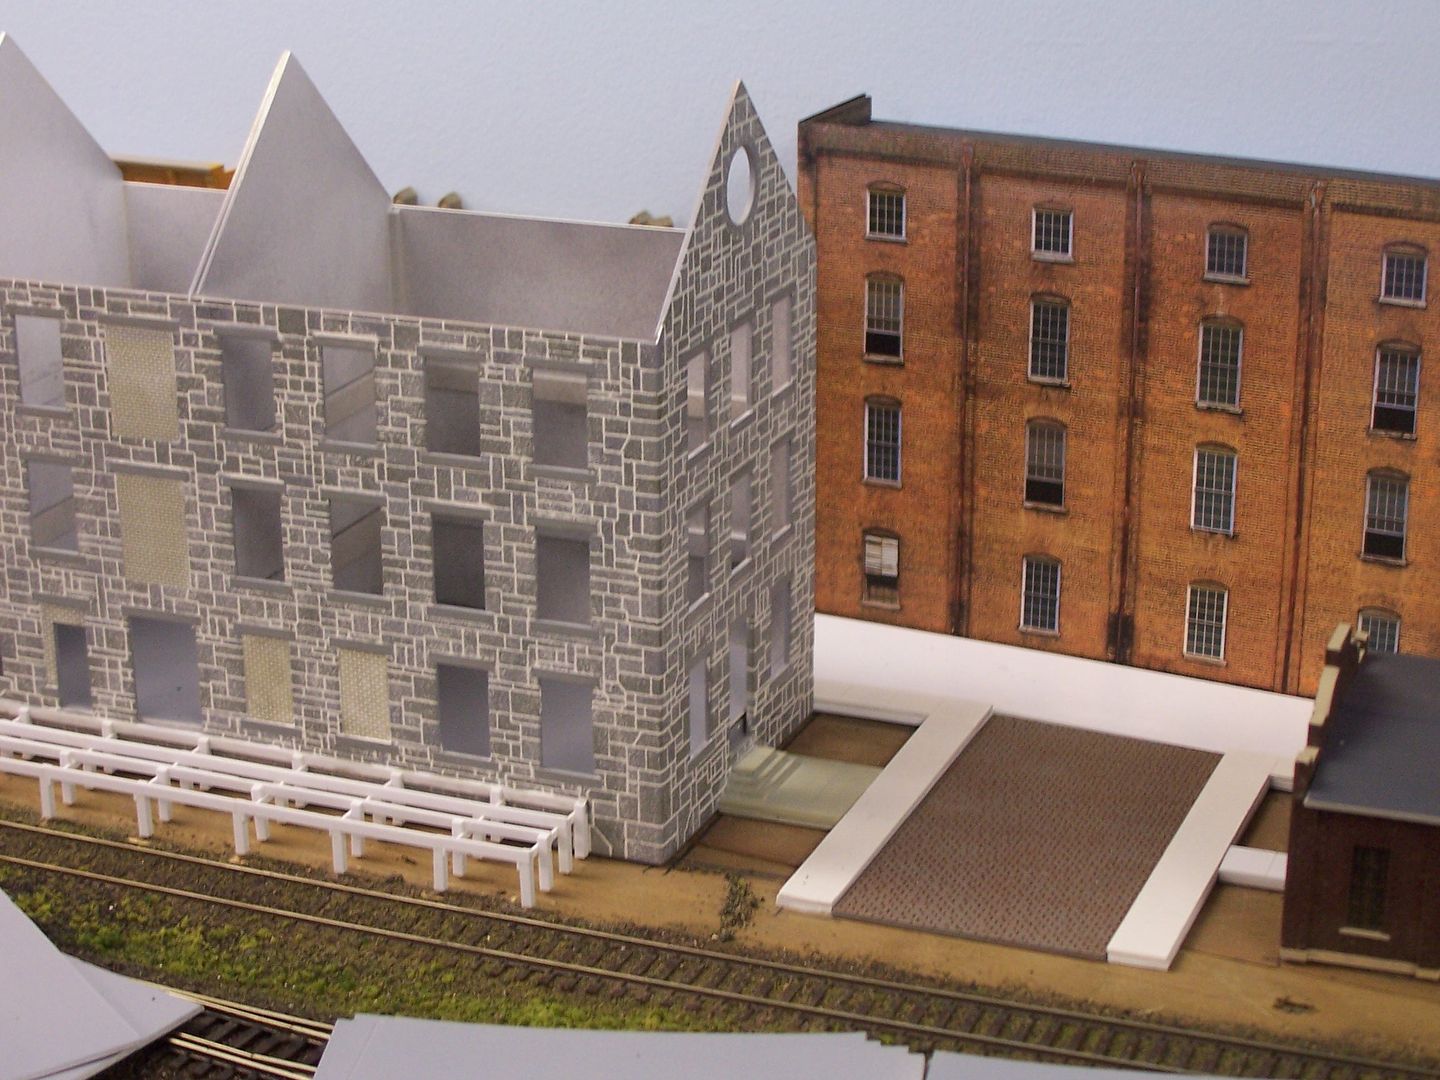
Here's the structure in place, with the surrounding area yat to be finished:
Wayne


  • Member since
    February 2002
  • From: Mpls/St.Paul
  • 13,892 posts
Posted by wjstix on Tuesday, June 30, 2015 12:24 PM

You might have to try different methods to find what works best for you. For me, on a plastic structure kit, I prefer to paint everything I can before assembly, including adding decals to the building walls. For a brick building, I prefer to paint both sides of a wall section with primer gray (usually Tamiya from a spray can). Then I use an art marker to color the individual bricks. The art marker has a fairly hard contact area, so it only paints the tops of the bricks, leaving the mortar part gray (or light tan, if you want to use that color instead of just leaving the primer gray). You can get art markers at an art supply store like Michael's. Any dark red to brown color will work. You can always make a few bricks a different shade by coloring it individually with the sharp end of the art marker (most come with two points, one broad and one fine) or a colored pencil.

If you look at the building behind the BN boxcar, that's a Walthers kit I used this method on. Notice I also left the trim the lighter color, like around the windows.

http://cs.trains.com/mrr/m/mrr-layouts/2289595.aspx

(Sorry the link doesn't seem to work, you'd have to cut and paste.)


Stix
  • Member since
    September 2003
  • 10,582 posts
Posted by mlehman on Tuesday, June 30, 2015 11:15 AM

Assuming we're talking plastic here...

If you ever have plans to light a building, best to paint the inside flat black first. For buildings with a visible interior, use a primer, brown/red is good, but there are others. Then you can cover that with a lighter, more tyocial interior color than black.

After that, it depends on the kit. Paint hides a multitude of errors, so I tend to hold off until the basic structure is assembled. This usually leaves aside things like doors, windows, etc, which tend to be on seprarate sprues and can be painted a contrasting color as you like. Apply the basic color to the structure and paint the add-ons with one or more additional colors. Then finish assembly, EXCEPT for window "glass." I weather things to my liking, if I'm in the mood, then shoot everything with Dullcote. Then I install the window glass last.

Mike Lehman

Urbana, IL

  • Member since
    May 2011
  • 743 posts
Posted by Steven S on Tuesday, June 30, 2015 11:03 AM

Styrene cement may cause enamel paints to run, so keep that in mind.

For mortar, you can get a small tub of premixed joint compound for a few bucks.  Rub it into the grooves and wipe off the excess.


Steve

  • Member since
    January 2010
  • From: Oklahoma
  • 409 posts
Painting Kits: When? Also, bricks?
Posted by Acela026 on Tuesday, June 30, 2015 10:54 AM

Two simple questions:

  • Is it better to paint the exterior of a structure kit before or after assembly? 


  • What is the best way to paint a brick-and-mortar surface so that it looks realistic?

Oh, and any other tips on painting models/kits in general are greatly appreciated!

Thanks in advance,

AcelaDunce

 The timbers beneath the rails are not the only ties that bind on the railroad.
           -
-Robert S. McGonigal

Subscriber & Member Login

Login, or register today to interact in our online community, comment on articles, receive our newsletter, manage your account online and more!

Users Online

There are no community member online

Search the Community

ADVERTISEMENT
ADVERTISEMENT
ADVERTISEMENT
Model Railroader Newsletter See all
Sign up for our FREE e-newsletter and get model railroad news in your inbox!